
文章目录[x]
- 0.1:一、使用深度图的方式
- 0.2:二、使用Projector组件
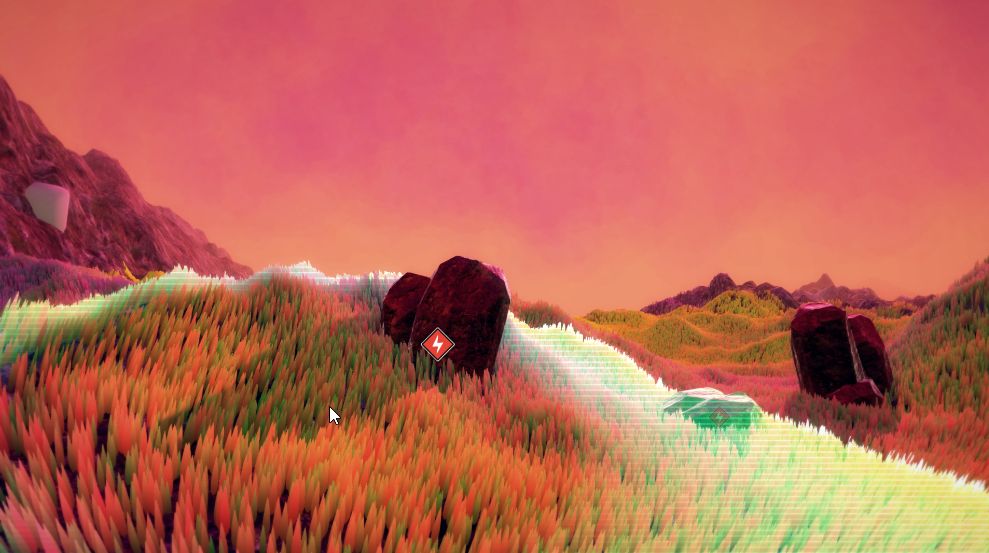
游戏中许多地方会需要用到扫描效果,比如无人深空中的扫描,手雷扔出去前的预判范围,死亡搁浅等等。
一、使用深度图的方式
相关链接:https://zhuanlan.zhihu.com/p/143788955
https://github.com/Broxxar/NoMansScanner
Shader "Hidden/ScannerEffect"
{
    Properties
    {
        _MainTex("Texture", 2D) = "white" {}
        _DetailTex("Texture", 2D) = "white" {}
        _ScanDistance("Scan Distance", float) = 0
        _ScanWidth("Scan Width", float) = 10
        _LeadSharp("Leading Edge Sharpness", float) = 10
        _LeadColor("Leading Edge Color", Color) = (1, 1, 1, 0)
        _MidColor("Mid Color", Color) = (1, 1, 1, 0)
        _TrailColor("Trail Color", Color) = (1, 1, 1, 0)
        _HBarColor("Horizontal Bar Color", Color) = (0.5, 0.5, 0.5, 0)
    }
    SubShader
    {
        // No culling or depth
        Cull Off ZWrite Off ZTest Always

        Pass
        {
            CGPROGRAM
            #pragma vertex vert
            #pragma fragment frag

            #include "UnityCG.cginc"

            struct VertIn
            {
                float4 vertex : POSITION;
                float2 uv : TEXCOORD0;
                float4 ray : TEXCOORD1;
            };

            struct VertOut
            {
                float4 vertex : SV_POSITION;
                float2 uv : TEXCOORD0;
                float2 uv_depth : TEXCOORD1;
                float4 interpolatedRay : TEXCOORD2;
            };

            float4 _MainTex_TexelSize;
            float4 _CameraWS;

            VertOut vert(VertIn v)
            {
                VertOut o;
                o.vertex = UnityObjectToClipPos(v.vertex);
                o.uv = v.uv.xy;
                o.uv_depth = v.uv.xy;

                #if UNITY_UV_STARTS_AT_TOP
                if (_MainTex_TexelSize.y < 0)
                    o.uv.y = 1 - o.uv.y;
                #endif

                o.interpolatedRay = v.ray;

                return o;
            }

            sampler2D _MainTex;
            sampler2D _DetailTex;
            sampler2D_float _CameraDepthTexture;
            float4 _WorldSpaceScannerPos;
            float _ScanDistance;
            float _ScanWidth;
            float _LeadSharp;
            float4 _LeadColor;
            float4 _MidColor;
            float4 _TrailColor;
            float4 _HBarColor;

            float4 horizBars(float2 p)
            {
                return 1 - saturate(round(abs(frac(p.y * 100) * 2)));
            }

            float4 horizTex(float2 p)
            {
                return tex2D(_DetailTex, float2(p.x * 30, p.y * 40));
            }

            half4 frag (VertOut i) : SV_Target
            {
                half4 col = tex2D(_MainTex, i.uv);

                float rawDepth = DecodeFloatRG(tex2D(_CameraDepthTexture, i.uv_depth));
                float linearDepth = Linear01Depth(rawDepth);
                float4 wsDir = linearDepth * i.interpolatedRay;
                float3 wsPos = _WorldSpaceCameraPos + wsDir;
                half4 scannerCol = half4(0, 0, 0, 0);

                float dist = distance(wsPos, _WorldSpaceScannerPos);
                //控制扫描线范围 linearDepth<1为了不出现在天空盒上
                if (dist < _ScanDistance && dist > _ScanDistance - _ScanWidth && linearDepth < 1)
                {
                    float diff = 1 - (_ScanDistance - dist) / (_ScanWidth);
                    half4 edge = lerp(_MidColor, _LeadColor, pow(diff, _LeadSharp));
                    scannerCol = lerp(_TrailColor, edge, diff) + horizBars(i.uv) * _HBarColor;
                    scannerCol *= diff;
                }

                return col + scannerCol;
            }
            ENDCG
        }
    }
}
using UnityEngine;
using System.Collections;

[ExecuteInEditMode]
public class ScannerEffectDemo : MonoBehaviour
{
    public Transform ScannerOrigin;
    public Material EffectMaterial;
    public float ScanDistance;

    private Camera _camera;


    void Start()
    {
    }

    void Update()
    {
        ScanDistance += Time.deltaTime * 12;
        if (Input.GetMouseButtonDown(0))
        {
            Ray ray = _camera.ScreenPointToRay(Input.mousePosition);
            RaycastHit hit;

            if (Physics.Raycast(ray, out hit))
            {
                ScanDistance = 0;
                ScannerOrigin.position = hit.point;
            }
        }
    }

    void OnEnable()
    {
        _camera = GetComponent<Camera>();
        _camera.depthTextureMode = DepthTextureMode.Depth;
    }

    [ImageEffectOpaque]//只对不透明物体施加特效
    void OnRenderImage(RenderTexture src, RenderTexture dst)
    {
        EffectMaterial.SetVector("_WorldSpaceScannerPos", ScannerOrigin.position);
        EffectMaterial.SetFloat("_ScanDistance", ScanDistance);
        RaycastCornerBlit(src, dst, EffectMaterial);
    }

    //所以想要获取当前像素在世界空间的坐标,我们需要使用深度贴图来重构世界空间坐标
    //不能直接使用Graphics.Bilt(src,dst,mat);
    void RaycastCornerBlit(RenderTexture source, RenderTexture dest, Material mat)
    {
        float camFar = _camera.farClipPlane;
        float camFov = _camera.fieldOfView;
        float camAspect = _camera.aspect;

        float fovWHalf = camFov * 0.5f;

        Vector3 toRight = _camera.transform.right * Mathf.Tan(fovWHalf * Mathf.Deg2Rad) * camAspect;
        Vector3 toTop = _camera.transform.up * Mathf.Tan(fovWHalf * Mathf.Deg2Rad);

        Vector3 topLeft = (_camera.transform.forward - toRight + toTop);
        float camScale = topLeft.magnitude * camFar;

        topLeft.Normalize();
        topLeft *= camScale;

        Vector3 topRight = (_camera.transform.forward + toRight + toTop);
        topRight.Normalize();
        topRight *= camScale;

        Vector3 bottomRight = (_camera.transform.forward + toRight - toTop);
        bottomRight.Normalize();
        bottomRight *= camScale;

        Vector3 bottomLeft = (_camera.transform.forward - toRight - toTop);
        bottomLeft.Normalize();
        bottomLeft *= camScale;

        // Custom Blit, encoding Frustum Corners as additional Texture Coordinates
        RenderTexture.active = dest;

        mat.SetTexture("_MainTex", source);

        GL.PushMatrix();
        GL.LoadOrtho();

        mat.SetPass(0);

        GL.Begin(GL.QUADS);

        GL.MultiTexCoord2(0, 0.0f, 0.0f);
        GL.MultiTexCoord(1, bottomLeft);
        GL.Vertex3(0.0f, 0.0f, 0.0f);

        GL.MultiTexCoord2(0, 1.0f, 0.0f);
        GL.MultiTexCoord(1, bottomRight);
        GL.Vertex3(1.0f, 0.0f, 0.0f);

        GL.MultiTexCoord2(0, 1.0f, 1.0f);
        GL.MultiTexCoord(1, topRight);
        GL.Vertex3(1.0f, 1.0f, 0.0f);

        GL.MultiTexCoord2(0, 0.0f, 1.0f);
        GL.MultiTexCoord(1, topLeft);
        GL.Vertex3(0.0f, 1.0f, 0.0f);

        GL.End();
        GL.PopMatrix();
    }
}
使用的时候我们利用上面的shader创建一个材质球,然后在camera上挂载ScannerEffectDemo 脚本,并且把先前创建的材质球赋值到组件上。再创建一个新的空物体赋值到组件上就可以了。我们用鼠标点击场景就出现效果了。
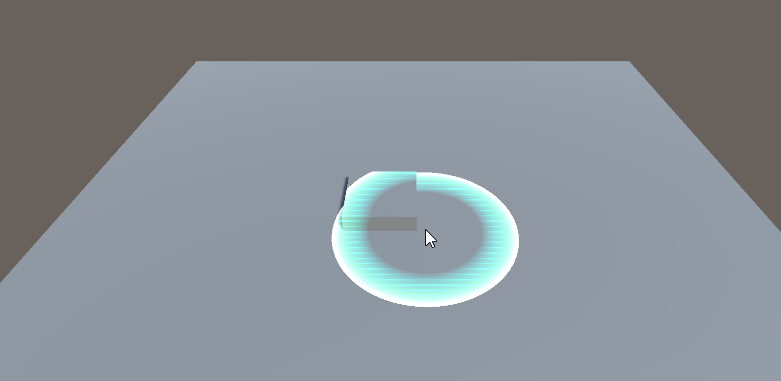
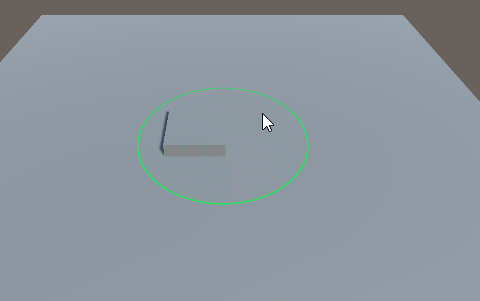
二、使用Projector组件
1.先写一个projector用的shader
Shader "Custom/ProjectorDecal"
{
    Properties
    {
        //调色
        _Color("Color", Color) = (1,1,1,1)
        //投影图片
        _MainTex("Albedo (RGB)", 2D) = "white" {}
        //根据投影仪视距渐变的图片
        _FalloffTex("Falloff",2D) = "white"{}
    }
    SubShader
    {
        Pass
        {
            ZWrite Off
            //解决ZFighting现象
            Offset -1, -1
            Blend SrcAlpha OneMinusSrcAlpha

            CGPROGRAM

            #pragma vertex vert
            #pragma fragment frag
            #include "UnityCG.cginc"

            float4 _Color;
            //将投影仪剪辑空间的X和Y轴映射到U和V坐标,这些坐标通常用于对径向衰减纹理进行采样。
            float4x4 unity_Projector;
            //将投影仪视图空间的Z轴映射到U坐标(可能在V中复制它),该坐标可用于采样渐变纹理,该纹理定义投影仪随距离衰减。u值在投影仪近平面处为0,在投影仪远平面处为1。
            float4x4 unity_ProjectorClip;
            sampler2D _MainTex;
            sampler2D _FalloffTex;

            struct v2f {
                float4 uvDecal:TEXCOORD0;
                float4 uvFalloff:TEXCOORD1;
                float4 pos:SV_POSITION;
            };

            v2f vert(appdata_img v) {
                v2f o;
                o.pos = UnityObjectToClipPos(v.vertex);
                //四元纹理坐标给UNITY_PROJ_COORD读取
                o.uvDecal = mul(unity_Projector, v.vertex);
                o.uvFalloff = mul(unity_ProjectorClip, v.vertex);
                return o;
            }

            float4 frag(v2f i) :SV_Target
            {
                float4 decal;
                //解决图片四周拖影
                if (i.uvDecal.x / i.uvDecal.w < 0.0001 || i.uvDecal.x / i.uvDecal.w>0.9999 || i.uvDecal.y / i.uvDecal.w < 0.0001 || i.uvDecal.y / i.uvDecal.w>0.9999)
                {
                    decal = float4(0, 0, 0, 0);
                }
                else
                {
                    //采样齐次uv,分量都除以了w
                    decal = tex2Dproj(_MainTex, UNITY_PROJ_COORD(i.uvDecal));
                }
                float falloff = tex2Dproj(_FalloffTex, UNITY_PROJ_COORD(i.uvFalloff)).r;
                return float4(decal.rgb * _Color.rgb,decal.a * falloff * _Color.a);
            }
            ENDCG

        }
    }
}
2.写一个控制projector缩放的脚本。
using UnityEngine;

public class DecalManager : MonoBehaviour
{
    private Projector projector;
    [SerializeField]
    private bool looping = false;
    private float size = 0;
    public float spreadSpeed = 1f;
    public float maxSize = 10f;
    private Color alphaColor;
    private void Start()
    {
        projector = GetComponent<Projector>();
        projector.orthographic = true;
        projector.orthographicSize = 0;
        alphaColor = new Color(projector.material.color.r, projector.material.color.g, projector.material.color.b, 0);
    }

    private void Update()
    {
        size += Time.deltaTime * spreadSpeed;
        if(size<maxSize)
        {
            projector.orthographicSize = size;
            alphaColor.a = 1 - size / maxSize;
            projector.material.color = alphaColor;
        }
        else
        {
            if(looping)
            {
                size = projector.orthographicSize = 0;
            }
            else
            {
                Destroy(gameObject);
            }
        }
    }
}
3.在场景中创建一个空物体,然后添加Projector组件,再用上面写的shader创建一个材质球赋值到projector上面。
4.把上面写的脚本挂载到projector上面,运行。
源码地址:http://horse7.cn/download/scenescanner.unitypackage